
Build and Publish a Web App in 10 Minutes with AI – No Coding Required!

Learn how to build and publish a fully functional Background Remover web app in just 10 minutes using AI. No coding skills needed—fast, easy, and free!
Today, in the next 5 to 10 minutes, you can create a fully functioning web app with AI—that too, with zero coding required? You're probably thinking coding is hard and time-consuming. Yes, it was, but not anymore. What you're about to see in this guide will shatter everything you thought you knew about web development. I'm going to walk you through a groundbreaking new AI tool that enables anyone to build and publish a web app faster than you ever imagined possible. So, no more struggling to learn complex programming languages, no more spending hours writing code line by line, and fixing bugs manually. By the end of this guide, you'll be able to use a cutting-edge AI tool that I'm about to show you to bring your app idea to life. If you read the guide till the end, I'll also show you how you can publish your app online for free. So, keep reading. Let's get started.
Note: The blog contains screenshots to guide you through each step, ensuring you can follow along easily and create your web app without any difficulties.
Step 1: Create an Account on Bolt AI
This is the tool that's going to help us build our web app, and it makes everything so easy. It handles everything for you, from creating the app to making it live online.
- To create an account on Bolt AI, Go to Bolt AI, and it will take you to the page.
- Click Get Started and sign in with your GitHub account. If you already have a GitHub account, sign in here. If not, you can create an account by clicking the provided link.
- Once signed in, click Authorize StackBlitz and you're in.


Now, we have successfully created an account on Bolt AI.
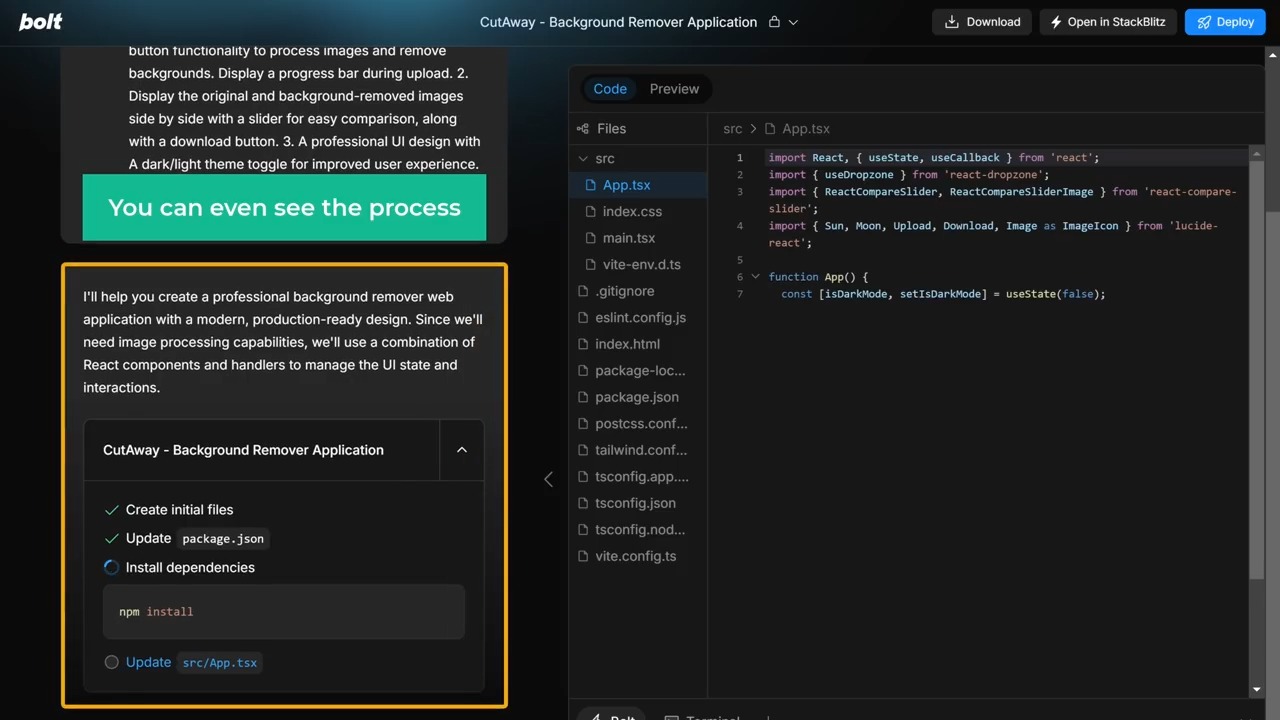
Step 2: Create the Web Application
You can create a working web application just by giving a prompt. There are still a few drawbacks, which I will discuss later in the guide.
For example, let's say you want to create a background remover web application that allows you to upload any image and then instantly remove the background. To do this:
- Enter a prompt: “Include an image upload function, remove the background, display the results in a slider comparison, and design a responsive professional interface that works smoothly on all devices.”

- Click Start Generating the Application (The Blue Button).

The tool creates all the necessary files and writes the code automatically. You can see the process in real-time. Once complete, your web application will be ready with all the requested features.


Step 3: Set Up Backend Services
Let’s test our app. Drag and drop an image. You’ll see the result, but the background might not be removed because API integration services are not fully configured.
What is an API?
An API, or Application Programming Interface, is a set of defined rules that enable different applications, services, or systems to communicate with each other. It allows one system to request services or data from another system, and receive the response in a structured and standardized format.
Think of an API as a messenger between different systems. Imagine you're at a restaurant and you want to order food. You can't just walk into the kitchen and start making your own food, because that's not how it works. Instead, you give your order to the waiter, who takes it to the kitchen staff. They then prepare your food according to your request, and the waiter brings it back to you.

.png)
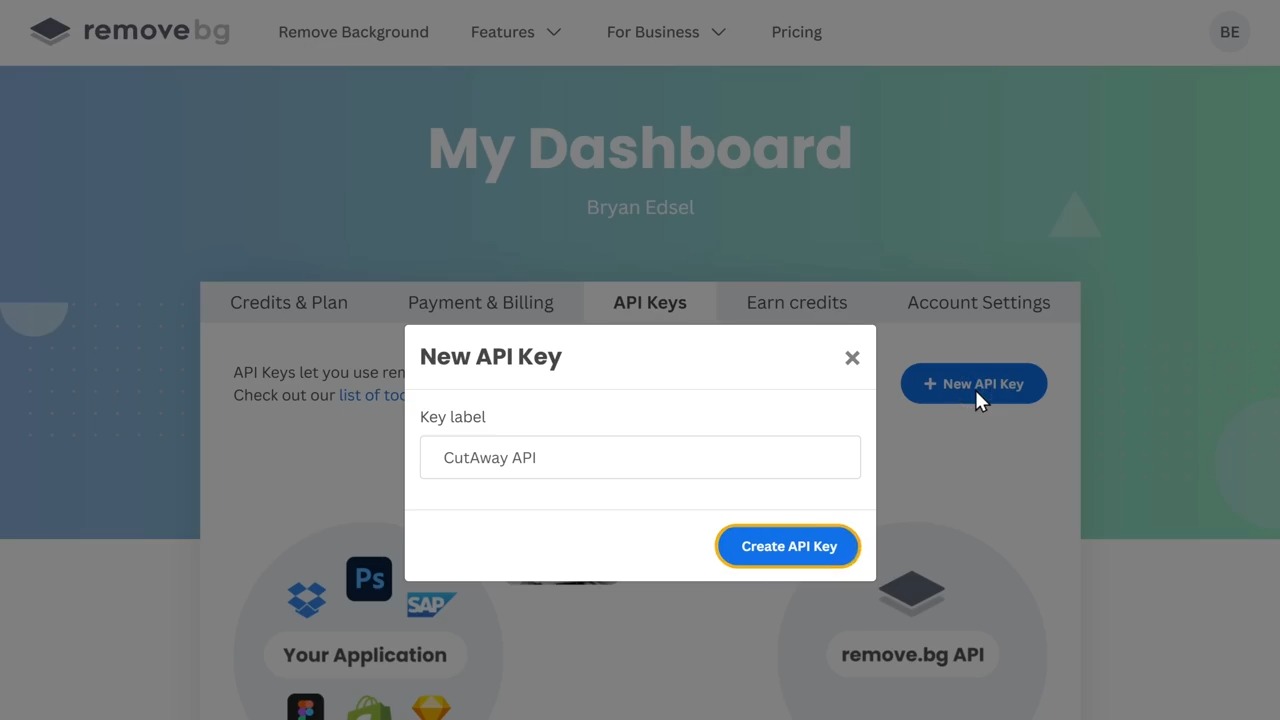
To fix this:
- Use a third-party service to remove the background. For example, search for a free background removal API. Here is a list of free background removal APIs that you can utilize for various applications: Picsart Enterprise API, Remove.bg API, etc.
- Get the API key:
- Go to the API provider's site. Go to Remove.bg API
- Click Get API Key, then click Create API Key to generate one.


- Copy the key and integrate it with your app:
- Return to the background remover app you were building and proceed by entering the following prompt: "Set up API integration with
API-Key: INSERT_YOUR_API_KEY_HERE”. Ask it to configure the API integration using the API key you have copied. Alternatively, you can request it to design a text field in the app interface where you can input the API key.


Now, drag and drop an image again. The background will be successfully removed, and you can compare the before and after results.

.png)
Step 4: Customize the Web App
Make the app more user-friendly and professional by customizing its features:
- Let's create a menu and a sample image on the landing page that will illustrate how to use the app by providing a prompt. Enter this prompt: 'Create a navigation menu and add sample images for testing.' The tool will generate a menu with working pages.
- Optionally, update the logo and app name by providing a prompt. For example, change the app name to 'StudioAgatho' and replace the logo with an eraser icon. For the logo, you can provide an image link if available, which is the most effective method for updating the logo.
- Your design might look different from mine, and that's perfectly fine. Be flexible and adapt as needed. If you've made it this far, treat yourself to a drink to celebrate your effort!
- Download the project by clicking Download and save it to your computer.


Step 5: Launch the Web App
Make the app live and accessible online:
- Click Deploy to start launching the app.
- Once deployed, you’ll receive a URL to access your application. Note:
- If published on platforms like Netlify without a backend server, the API key will be visible in the source code. This is not secure for production use. To secure it, set up a separate backend server
- Test the app to ensure all features are working, and share the link with others.
Additional Notes
- Bolt AI is ideal for frontend applications. For long-term storage or complex apps, a separate backend server and database connection are required.
- Knowledge of basic coding helps you maximize the tool’s potential.
Creating Another Application: AI Chatbot
Let’s create an AI chatbot like ChatGPT:
- Create a New Project. Enter a prompt: “Create an AI chatbot with a green theme.”
- The tool will generate the app with a functional UI.


- To make the chatbot respond:
- Integrate it with OpenAI’s API, similar to what we did for the Background remover web application, by following the same steps as before (get API key from OpenAI ChatGPT ).
- Visit the OpenAI website. Sign up for an account if you don’t have one. You can use your email, Google, or Microsoft account to register. Verify your email address if required.
- Access the API Dashboard: Log in to your OpenAI account. Navigate to the API dashboard. Go to the API Keys section in the dashboard. Click on the + Create new secret key button. A new API key will be generated and displayed.
⚠️ Important: Copy the key immediately, as you won’t be able to view it again later.
Save your API key securely. Avoid sharing it publicly or storing it in plaintext files. Use the API key in your applications to authenticate requests to the OpenAI API.
- Test the app by uploading images or asking questions. if you don't have the attach file button, ask bolt AI to add it to your chatbot web application.
- Deploy the app online.


Note: Bolt AI works on a token system. You get 150,000 tokens daily, and each prompt uses some tokens. Upgrade your plan for additional tokens.